Affichage des articles dont le libellé est free pattern. Afficher tous les articles

jeudi 5 janvier 2012

Nouveau projet crochet: Blooming flower cushion

Envie d’un nouveau projet rigolo à crocheter, mon choix s’est arrêté sur un coussin très flashy vu chez Lucy (Attic 24).

Pour ma part je n’utilise que 4 couleurs, 2 tons de jaune et 2 tons de rouille, pour une version plus sobre et qui surtout se mariera mieux avec ma déco du salon Clignement d'œil.

Le départ de la fleur :

Blooming flower - begin


Blooming flower - begin (2)

Modèle Blooming flower cushion

Laine Merino cablé et Napoli de Jakob wolle

Crochet 4.5 mm


Happy crocheting

lundi 21 février 2011

Tutoriel Carré Old America en crochet Granny square tutorial

Bonjour Sourire !
Après une petite absence, je reviens vers vous pour vous offrir un petit tutoriel en crochet en français and in english:
Le fameux et indémodable Carré Old America.
Je dois avouer que je l’affectionne particulièrement, il me rappelle mon enfance et la tante qui m’a patiemment appris le crochet, il se réalise rapidement et se prête à la confection de nombreux ouvrages. De plus, il me permet de jouer avec les couleurs, et d’utiliser des restes de pelotes.
Just happy to share with you how I do the basic granny square. This granny is forever the best for me as it reminds me when I was little and my beloved Auntie who learnt me to crochet.
CARRE OLD AMERICA
GRANNY SQUARE
Carré Old America - granny square
Legend english - french carré old america

Begin with a sliding loop 
Commencer avec un Anneau magique
Carré old america
Round 1 :  3 beg ch, 2 dc, 2 ch, *3dc, 2 ch* repeat from * to * 3 times, join with sl st in top of beg 3 ch.
Tour 1 : 3 ml, 2 B, 2 ml, *3B, 2 ml* répéter de * à * 3 fois, 1 mc dans la 3ème ml du début du tour.
Carré old america (2)
Carré old america (3)
Cut the yarn and pull it on the wrong side.
Couper le fil et le transférer sur l’envers.
Carré old america (4)
Round 2 : join with new color in any ch 2 space, (3 beg ch, 2 dc) in same ch space, 1 ch, *(3dc, 2 ch, 3dc) in next ch space, ch 1* repeat from * to * 3 times, (3 dc, 2 ch) in next ch space, join with sl st in top of beg 3 ch.
Tour 2 : commencer avec la nouvelle couleur dans un arceau de 2 ml, 3 ml, 2 B, 1 ml, *(3 B, 2 ml, 3 B) dans l’arceau suivant, 1ml* répéter de * à * 3 fois, (3 B, 2ml ) dans le dernier arceau, 1 mc dans la 3ème ml du début du tour.
Carré old america (5)
Carré old america (6)
Carré old america (7)
Carré old america (8)
Cut the yarn and pull it on the wrong side.
Couper le fil et le transférer sur l’envers.
Carré old america (9)
Round 3 : join with new color in any ch 2 space, (3 beg ch, 2 dc) in same ch space, 1 ch, *(3 dc, ch 1) in next ch 1 space, (3dc, 2 ch, 3dc) in next ch space, ch 1* repeat from * to * 3 times, (3 dc, ch 1) in next ch 1 space, (3 dc, 2 ch) in next ch 2 space, join with sl st in top of beg 3 ch.
Tour 3 : commencer avec la nouvelle couleur dans un arceau de 2 ml, 3 ml, 2 B, 1 ml, *(3 B, 1 ml) dans l’arceau suivant, (3 B, 2 ml, 3 B) dans l’arceau suivant, 1ml* répéter de * à * 3 fois, (3 B, 1 ml) dans l’arceau suivant, (3 B, 2ml ) dans le dernier arceau, 1 mc dans la 3ème ml du début du tour.
Carré old america (10)
Carré old america (11)
Cut the yarn and pull it on the wrong side.
Couper le fil et le transférer sur l’envers.
Carré old america (12)
Continue in this manner, repeting round 3 and working a (3 dc, ch 1) in each additional ch 1 space from previous round, until you reach the desired size.
Continuer en répétant le 3ème tour et en exécutant (3 B, 1 ml) dans chaque arceau supplémentaire du rang précédant jusqu’à obtention de la taille désirée.
Carré old america (13)
Carré old america (14)
Et voilà ! La prochaine fois, je vous expliquerai pourquoi je commence mes tours au milieu de l’angleClignement d'œil.
En attendant, je vous remercie de votre passage et de vos sympathiques, et toujours très appréciés, commentaires Coeur rouge .
The next time I’ll explain to you why I begin my rounds in the middle of the corner Clignement d'œil.
Thank you so much to be here with me and hope you’ll have fun with this granny square.
And a BIG THANK YOU for your so nice and appreciated comments Coeur rouge.
Bien à Vous
Happy crocheting Sourire.
Stefanina

lundi 24 janvier 2011

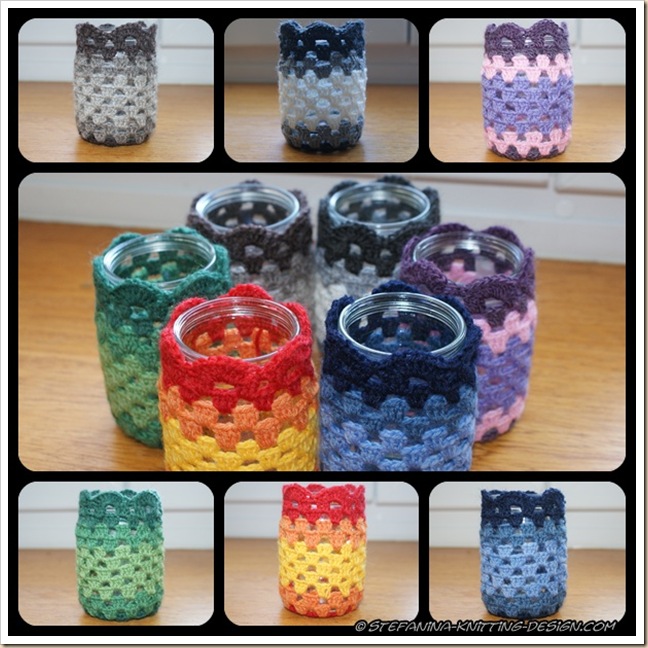
Colored granny cover for pencils: step by step tutorial

Colored granny cover - montage 1

As promised yesterday, I share with you a how to work these cute crocheted cover pot :

To cover a pot:

  • diameter : 6 cm
  • circumference 20 cm
  • high 9 cm

Yarn: Fingering sock yarn, (200 m / 50g) about 10 g for each pot

Hook: 3 mm

Abbreviation and Stitches (US terminology):

  • Ch: chain
  • dc: double crochet
  • sc: single crochet
  • beg: beginning

Here is the way I have changed the colors, but you can do the color change as you desire.

  • Color A : Round 1 to 3
  • Color B : Round 4 and 5
  • Color C : Round 6 to 10
  • Color B : Round 11 and 12
  • Color A : Round 13 to 15

Begin with a sliding loop

  • Round 1 Ch 3, 2dc, ch 1 *3 dc, ch 1* repeat from * to * 5 times around, join with slip stitch in top of 3 beg ch. (6 groups of 3 dc)
  • Colored cover granny tuto 1
  • Round 2 (ch 3, 2 dc) in 1st ch space, ch 1 *(3 dc, ch 1, 3dc, ch1) in next ch space,* repeat from * to * 5 times, 3dc in next ch space, ch 1, join with slip stitch in top of 3 beg chain. (12 groups of 3dc)
  • Colored cover granny tuto 2
  • Round 3 (ch 3, 2 dc) in 1st ch space, ch 1 *3 dc in next ch space, ch 1* * repeat from * to * 11 times, join with slip stitch in top of 3 beg chain. (12 groups of 3dc)
  • Colored cover granny tuto 3
  • Round 4 to 14 repeat round 3
  • Round 15 (ch 3, 3 dc) in 1st ch space, sc in next ch space, *7dc in next ch space, sc in next ch space*, repeat from * to * 5 times, 3 dc in next ch space, join with slip stitch in top of 3 beg chain. ( 6 shells)
  • Colored cover granny tuto 4

Cut the yarn and weave in end.

Put the colored pencils in the pots Rire.

Colored cover granny with pencils

 Colored cover granny with pencils 1

Colored cover granny with pencils 2

Questions "Je ne sais pas" ? Comments Courrier électronique ? Please contact me via comments on the bottom.

By Stefanina © January 2011
http://www.stefanina-knitting-design.com/

Want to share ? Just please link to my blog, thank you for respecting my work.

Hope you’ll enjoy it!

Happy crocheting Clignement d'œil

Bien à vous

Stefanina

samedi 15 janvier 2011

Color Wheel Socks

Bonjour !
As promised, the Sock pattern for my Color Wheel Socks has been published in my Ravelry Store :
Color wheel socks montage

These socks are perfect to use Sock yarn left-over.
For the Small size I have used less than one 50 g skein for the main color  and about 3 m for each color band.
The color ripples are worked using slipping stitches in a Mosaic pattern, so only one color is worked for each round.
A fun and easy pattern to knit.
This pattern is a FREE pattern and can be downloaded.

Wish you a lot fun and a very happy knitting week-end
See you soon
Bien à Vous
Stefanina

vendredi 14 janvier 2011

Sock yarn left-over : how to use them. Part III

Bonjour !
Au vu des dernières journées grises et pluvieuses, je vous apporte un peu de vitamines et plein de couleur pour ensoleiller votre journée Soleil.
Les fruity biscotti terminées,
Fruity biscotti sock finished
je n’ai pu m’empêcher de commencer une autre paire de chaussettes :
Tout d’abord un choix de 12 couleurs provenant de mes restes :
Color Wheel Socks - yarn choice
Un motif rigolo dit “Mosaic pattern” en français motif à maille glissées:
Color wheel Socks leg (2)
Le changement de couleur est tellement addictif, que j’ai attrapé le syndrome du one more row…..Clignement d'œil. Mal m’en a pris, en terminant la première chaussette, j’ai constaté l’ampleur des dégâts :
The dark side of the sock!
2 fils à arrêter par changement de couleur, ce qui nous donne (23 X 2) + 2 fils de la couleur principale, pas mal pour quelqu’un qui n’aime pas, mais alors pas du tout Fou furieux, arrêter les fils!
Après quelques heures minutes, enfin un temps certain , le résultat :
Color wheel socks - waves in end
Après cet exercice de haute voltige, j’ai repris mon livre favori et ai tout de suite appliqué la méthode de tissage des fils pour les arrêter pendant la phase de tricotage!
Le résultat final
Color wheel socks - finished
La bordure est réalisée selon la méthode Latvian cast-on edge.
Color wheel socks - close-up (2)
Le patron de ce modèle sera bientôt disponible gratuitement.
En attendant, et toujours dans l’idée de réduire mon stock de reste, une nouvelle paire sur les aiguilles, inspirée par mon Saint-paulia :
Nymphea (4)
Nymphea socks - color choice
Nymphea Sock - cuff
La bordure est également tricotée en utilisant la Latvian cast-on edge. Quand on aime on ne compte pas ! Et pour le motif principal, j’ai continué mon exploration des “Mosaic pattern:
Nymphea Socks - close-up (7)
Merci de m’avoir lue jusqu’ici Sourire. Je retourne à mes explorations, à bientôt
Bien à Vous
Stefanina